
Having built my caboose, passenger car & flat car from wood, my skeleton log cars from metal I wanted my last freight car to a plastic model. I have collected over the years a number of Tichy Trains plastic kits, I had some boxcars, flat cars and even a cement car. Having already built a flat car I needed to build something different so I opted for one of the box car kits. In this case a rebuilt USRA box car, I decided that i would letter the car for the ficticious Turtle Creek Central a railroad that appeared in the Model Railroader Magazine back in 2003.
The start of the build concentrates on cleaning the components and drilling holes for grab iorns. Its essential to do the drilling now as its alot harder to do later. The first part of the build was to add the nuts supplied in the kit for weight to the underframe, i did this with some medium CA. Once dry I then started the build of the body, to be honest this is kinda self explanatory but you glue the ends to the body and roof casting and then secure that to the car floor.
After waiting for that to dry the next part of construction was the underframe and adding all the detail under here that your won’t really see when the model is on the layout is the longest part of this build. Start by adding the centre frames, making sure that these are the correct way round (they have a lip on them and holes for the train line that need to be in the correct place). Add the bolsters and then add the cross beams along the length of the car. With all the beams in place I added the kit supplied stands to the truck mounting points to protect the model


The next part of the kit was to add the plumbing for the brakes, don’t under estimate how hard or long this is going to take, it was probably 40-50% of the build. First add the train line (the main airline) along the centre of the car, i had to redo this as the first line wasn’t straight. Then I added the supports and the brake equipment castings to the underframe. With those fitted I added the brake hangers and the brake rodding. Then it was onto the airlines that connect the individual components to the train line, this wasn’t easy and if you don’t drill out the holes in the castings before you start on this its going to be impossible.


Now with the underframe complete I returned to the body, as there is still alot of detail to add there. I started with the boxcar side doors and side grab iorns before I moved onto the ends of the car. The grab iorns are made from brass wire and need to be secured with a dab of CA. The boxcar door is in three parts first the door runners are attached to the side of the car and then the door is put in place with no glue so that the door can slide open if required.


Having completed the sides i moved to the ends of the car, obviously you have one end here with brake equipment and I started with that end. The other end is similar but without the brake gear.


Time to move on to adding the ladders and the roof walkways. The ladders supplied in the kit need to be cut down to size for the end and side of the car, in total there are 4 ladders that need to be fitted. The roof walk way was fitted to the car and completed with brass corner grab irons that are supplied in the kit.


With the detail parts on each end I had the great idea to add my own cut levers a great detail not included in the kit. The problem was i did this rather late at night and didn’t engage brain, resulting in two lovely hand bent cut levers for a loco (i.e. operated from both sides of the car) but not so great on a box car where this would have only operated from the one side. Well its a ficticious railroad so the turtle creek decided to be different and we have a cut levers on both sides of the car end, but lesson learnt.


Time for the part of the build i hate, painting. I decided to paint the car box car red , roof brown on the roof and walkway, with a black underframe and car ends. Before painting I applied a grey plastic primer to the whole model. I then masked the bottom of the car sides and turned the car on its roof and painted the underside black, being careful not to miss any areas under the detail parts. I then painted the car end, there was nothing special here about the paint I used Tamiya flat black which drys with a very flat finish.


I then moved onto the sides and roof, painting the sides with model masters boxcar red and the roof in roof brown. when this had dried I added the couplings, trucks and Kadee air hoses.


I now moved on to dcaling the model, I used woodland scenics dry run decals for the car data. The Turtle Creek Central decals are by microscale, after applying them and allowing them to dry for i found that I had silvering so i pierced the decals in several places and applied micro sol. I then applied a coat of dullcote to seal the decals to the model and prepare for weathering.


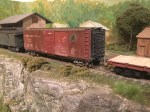
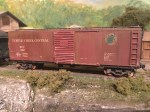
I had weathered the wheel sets in the trucks and the truck springs but over all the car needed a good weathering. Good weathering takes lots of layers and i applied layers of AK weathering enamels, mixing rust deposits with dust deposits before finishing the model with streaking coats of grime from the roof and down the sides of the car. what i also do is apply a very thin wash of thinners, using a soft brush that i dip in thinners and then dry off so the brush is just slightly moist. Here are a series of photographs that show how I built up the weathering on the model.


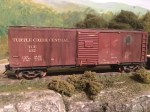

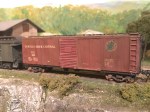
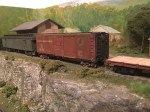
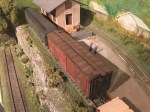
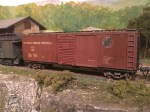
Here is the finished car.


Nice build, will refer to it when I build mine.
LikeLiked by 1 person
One more question. Did the kit as built acquire the necessary points to count towards the AP cert.?
LikeLike
I didn’t get this judged/assesed as i have no confidence in the ability for current AP chair for the British Region, to follow of understand the AP assesment rules and until their is a change in personnel i won’t be getting anything looked at in the UK.
LikeLike