Home

The Best Workbench in the World

Lots of people from across the world have distant links to the United Kingdom, many even claim to hail from Scotland. As I am lucky enough to now live and work in Scotland this this leads to lots of questions and requests for pictures of the lovely place that I now call home. So I decided what better than a page dedicated to my home and what I think is one of the greatest workbenchs in the world. Layout space may be a premium but nature provides one of the worlds greatest locations to work on my model railroad interests.

So where is home? – well Home now is Dysart in the Kingdom of Fife in Scotland.

well heck where is that?? well it is on the north bank of the fourth, just north of Edinburgh,

The village in which I live is called Dysart, it is along the coast between Dunfermline and St Andrews (yes that Golf and University City). It has quite a claim to fame, Major Pitcairn the Royal Marine Officer (Info) who was involved in the first battles of the American War of Independance was born in the village and the village has been used for filming of the TV series Outlander.

So lets look at the village:

So what makes this the best workbench in the world, well when its not raining here i the view I have:

19148946_10154847853303160_7739772206301722042_n

I also have my two best friends who help me with my Modelling … sometimes, we have Bingo & Dabber. Dabber loves a sound equipped loco and will sit and watch a Geep idle for at least 5 minutes lol thats along time in dog years.

Here is number one railfan Dabber:

and his mischievous older brother Bingo, who distrupts modelling by barking or standing on my sholders.


Passenger Car – Baggage Car

Image

Its a requirement of the AP Master Car Builders Certificate that you must build at least one item of passenger stock, that can be a passenger car, baggage/mail or express car. This can be scratchbuilt or a detailed craftsman kit, after a year long search for a craftsman passenger car kit in the UK, I hadn’t found a suitable kit. I was grateful therefore to David Gunn MMR 240 who gave me a labelle 50′ baggage car kit when I was lucky enough to visit his supurb layout in Nova Scotia, Canada.IMG_6389

Labelle have a great how to guide on their website that shows what is involved in building one of these great classics click here

So where to start? well first thing you should always do before you build a kit is read the plans & instructions. With the Labelle kit you get extensive scale drawings and written instructions. Start by identifying all the parts, you might need a rule or digital calipers as some parts in the same profile but varying sizes.
Here are the instructions included in the kit.

The first stage of construction is to add the planking to the car sides. Included in the kit are the pre milled car sides and scribed planking pieces that need to be cut to length and cemented to the sides, being careful not to waste any planking material as its needed for the doors and floors at the end of the cars. I used masking tape to keep the planking square until the glue sets, then trimmed the over hang at the bottom of the car.

Once the sides are compelte set aside and start to work on the passenger car ends. Again these start with a flat milled end piece that stripwood is added to build into 4D passenger car end. As this is a baggage car there is only a solid door in the car ends, passenger cars have a pair of windows in the car end walls either side of the door.

Building, detailing and Weathering Accurail Box Car kits

My main modelling interest is 1950s New England and in O scale, but on a recent visit to Wisconsin I spent a few days photographing along ex MILW and CNW tracks. I was impressed by the variety of motive power and rolling stock that I witnessed and there was hardly a unit train in sight. I decided that maybe it was time to do a bit of HO modelling again, having last modelling in HO as a teenager and attended some Calder Northern meets.

A green light was given by her who must be obeyed and permission was granted to visit a local hobby shop and Walthers show room (well worth a visit if you’re in Milwaukee). I remember fondly as a youngster taking my pocket money along to Calder Northern and coming away with a couple of Athearn blue box kits, which I would have, assembled and running in my little train when the next meet came around. I knew from reading the modelling press that most freight cars now come ready to roll, but I managed to pick up two Accurail kits from Walthers and after a trip to Engine House Services in Green Bay, WI I also acquired some of the new Evans 5100 double door box car kits in WC livery from Scale Trains.

Building the Kit

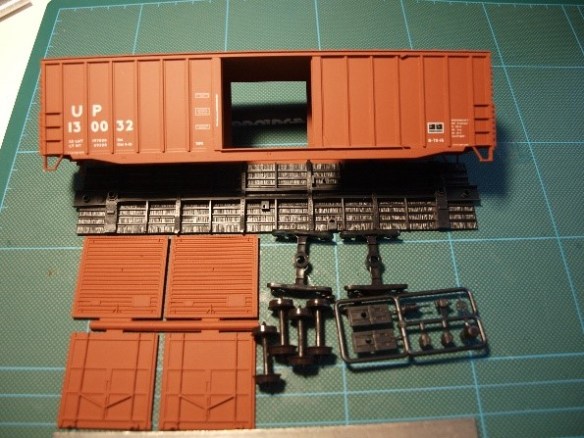
I decided that as they were similar to the Athearn blue box kits I used to build as a youngster I would start with the Accurail kits first. I had two types of 50’ box cars a BAR 50’ Welded Plug Door boxcar and a UP 50’ Exterior post boxcar. Picture 1 shows the parts you get in the kit, it includes Accurail knuckle couplers, correct doors and plastic wheel sets.

1

I decided to replace the Accurail couplers with Kadee number 5’s, to be consistent with my other stock.

The first thing to do with these kits is to clean up the parts, fortunately the plastic is moulded in the correct colour so a little sanding won’t result in the need for a new paint job. I had to remove flashing from the roof of the boxcar and you also need to remove some material from the underframe (pic 2&3).

Once all the parts are cleaned up the next thing to do is fit the weight to the floor of the box car, fortunately the doors on these boxcars are fixed otherwise this would be rather unsightly. I used vitalbond medium CA to secure the weight to the box car floor, this cures in about 20 seconds (pic 4&5).

There are three detail parts to add to the underframe and these go on next, these represent some of the brake gear, but the underframe is mostly hidden once the body is on. I suppose I could have added more details here and certainly if this was a O scale freight car I would, but expending lots of effort on things that cannot be seen isn’t very efficient modelling in my opinion.

When I was a teenager an old head said to me that in a train of 20 cars if the first three are super detailed and then there is a super detailed car every 6 or 7 cars the viewer will be tricked into thinking they are looking at a rake of 20 super detailed freight cars. In reality they would have seen maybe 5 super detailed cars and 15 straight from the box Ahearn blue box freight cars. Even in O scale my rule is if a part cannot be seen clearly at 2ft when stationary, then it definitely won’t be visible when your train is moving at a scale 20mph.

So back to kit building, I added the three detailing parts using Plastic Magic and a micro brush as an applicator, I find these cheap little brushes much easier to use than a paint brush and they come in a variety of different sizes. A neat feature of the Accurail kit is that the parts are moulded with semi-circular storks to make sure you get the parts fitted the right way round. So after removing them from the sprue with sprue cutters I cleaned them up with a nail file, added a dab of plastic magic to both parts and put them in place with a pair of tweezers.

Despite my comments about detailing, one thing I knew I wanted to add to this kit was air hoses, as I am considering fitting pacific western rail systems magna lock brake lines to my HO modern image stock. So at the least I need somewhere to attach them to, as the Accurail kits do not include any air hoses. I chose to fit Kadee part 438 which includes the air hose and angle cock and each packet contains ten pairs.

Each air hose and angle cock comes in three very small parts, two parts make up the mounting bracket and the third is the hose. To fit the mounting bracket to the underframe I needed to remove some of the bracing next to the draft box. I was then able to attach the mounting bracket to the side of the draft box using some more plastic magic.

I haven’t attached the air hoses yet as they are likely to get knocked off, so I will install them once the trucks and couplings have been fitted. As the underframe was now ready for fitting couplings and trucks and these are going to get some paint before fitting I decided to move onto the body. The kit comes with plug and Youngstown doors but for the prototype Youngstown doors needed to be fitted, I carefully cut the doors from the sprue with a No5 blade. The doors can only be fitted in the closed position and again these just need a spot of plastic magic to fix in place.

Paint & Weathering

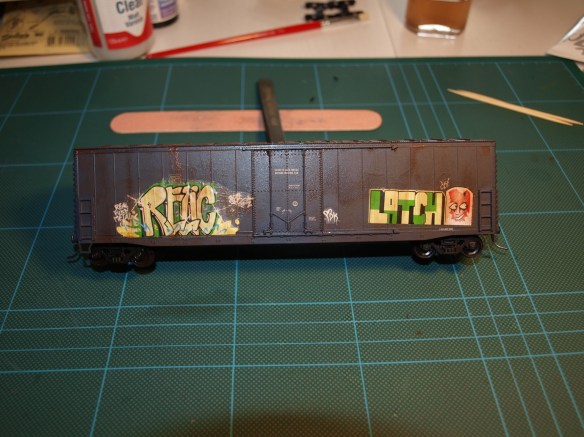
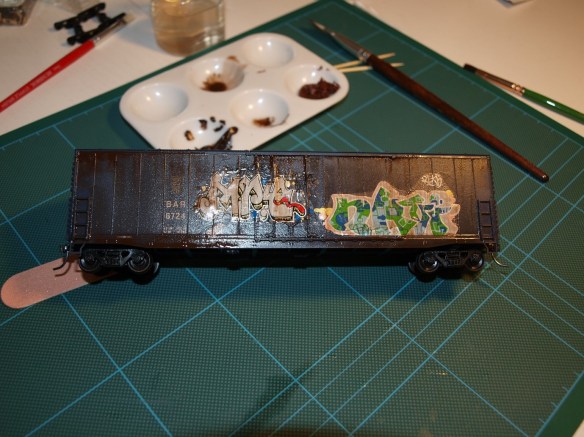
So now with the body and underframe ready for assembly I decided to start the painting and weathering. On my trip to Wisconsin fewer freight cars hadn’t been tagged by the local artist than those that had so I needed to add Graffiti to my two freight cars. I used microscale decals 87-1364 Modern Era Graffiti which I cut out and applied to the box cars, what I soon realised was that fitting large decals to exterior posts wasn’t easy in fact its nigh on impossible, but the welded BAR box car took the decals much better. I used Vallejo decal fix after applying the decals to the box cars and the picture show the box cars with the decal fix still curing.

Rust Spots older equipment especially these nearly 40 year old Box cars seem to be prone to rust appearing on the cars, usually in patches where there has been damage, around doors etc. So to model these I am using a two stage process with oil paints, first I used a cocktail stick to apply small rust spots with burnt sienna paint.

After leaving these for two hours to dry I ran a brush lightly soaked in turps down the side of the cars to give a streaked look.

For the BAR box car the older of the two freight cars I wanted to go for a general overall rust and grime look. I started by adding small quantities of burnt umber to the top of the sides of the boxcar, I then streaked this down the side of the box car using a wide brush dipped in white spirits.

21

For the roof I added raw sienna down the centre, as this is a pitched roof I then drew my white spirit soaked brush down both sides of the roof going from the centre to the outside.

22

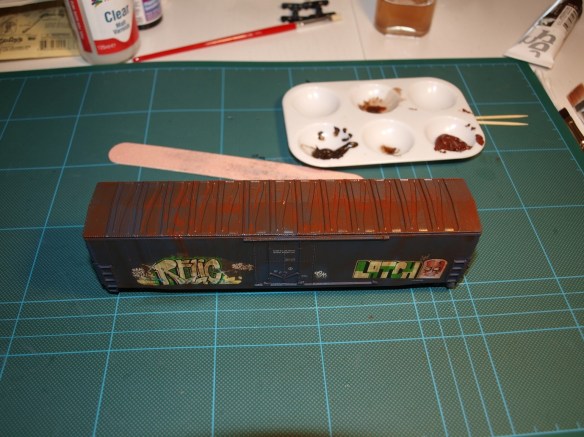
I then drew a few streaks down the box car sides to give the look of rain washing the rust from the roof down the car sides.

23


Golden Spike Bridge

I had time to work on my Golden Spike layout today and scratchbuilt a highway overpass. I used Balsa Wood and PVA glue just assembling the template to make a highway bridge that will be wide enough for two lanes of traffic. 

NMRABR Convention 2016 Contest Entries

So this weekend i am off to the NMRA regional convention here in the UK for the first time. I am also entering the contest for the first time, very brave i know, not just trying to meet the grade but you have to be brave to face the paperwork! 

Anyway i have 5 prototype photos going in and a HO caboose, plus 5 trackwork items for AP judging that i am still unclear if they go in the contest or some other room hidden away with AP judges. Anyway thats 11 form 901 and 6 form 902 filled in and ready to go. Step one completed i suppose….

Civil AP trackwork

It was a busy week last week, i managed to get the first two boards of my Civil AP work completed. I can only work on two boards at a time, there will be a third board which will contain the 14 degree crossing which is the third trackwork item i am working on. 

The first two boards contains #5 turnouts (3 of them but only one counts) and a #5 crossover. Having previously fitted the ties i stained them with a dark wood stain. 

I then test fitted my turnouts 

Once i knew everything was lined up i sprayed the turnouts with camo brown car spray paint and cleaned the rail heads with a wood block before the paint dried. 

The the hard part started i had the get the rails spiked down, i use micro engineering code 100 weathered rail and medium spikes. Straight away i ran into problems with the road bed offering zero resistance when i tried to drive my spikes. At this point though i was just glad i hadn’t ballasted the roadbed yet.

Having condluded that woodland scenics road bed was no good for hand spiked track i decided to drill pilot holes for my spikes to try and easy the pressure on the road bed. I used a #70 drill bit and a pin vice to make the holes and spiked every 6-8 ties. I will go back and add spikes on every tie later. 

This is a photo after the rails were laid but not yet wired up. Before i installed the track work i had soldered feed wires to the underside of the  rails and fitted the wires straight through the road bed and baseboard top before spiking. 

My top tips for track laying in this way are:

  1. Start from a datum end and always work away from that point.
  2. Use an NMRA gauge when spiking, make sure you check the rails are in gauge, fit one rail in then use the gauge to fit the second 
  3. Use weights to hold the rails in place when you spike them. 

To wire up the turnouts i used Gaugemaster DCC80 Auto frogs these are basically the same as a Tam Valley Frog Juicer but much cheaper and without the screw terminals you have to solder your feed wires. The image below shows how i gap my turnouts enabling metal fishplates to be used throughout and a single wire to feed the frog.
I used ground throws above the baseboard to throw the turnouts i decided this was the simplest way for the judges to test the model. 

So that meant the wiring was much more simplified. I installed a DCC Bus and connected the auto frogs to it and then to the frog feeder wire.

With these boards done i could erect board 3 which will have the crossing on it and i have installed the roadbed.